
JanSan Education
Learn How to Get the Most From Your JanSan Products
Education:
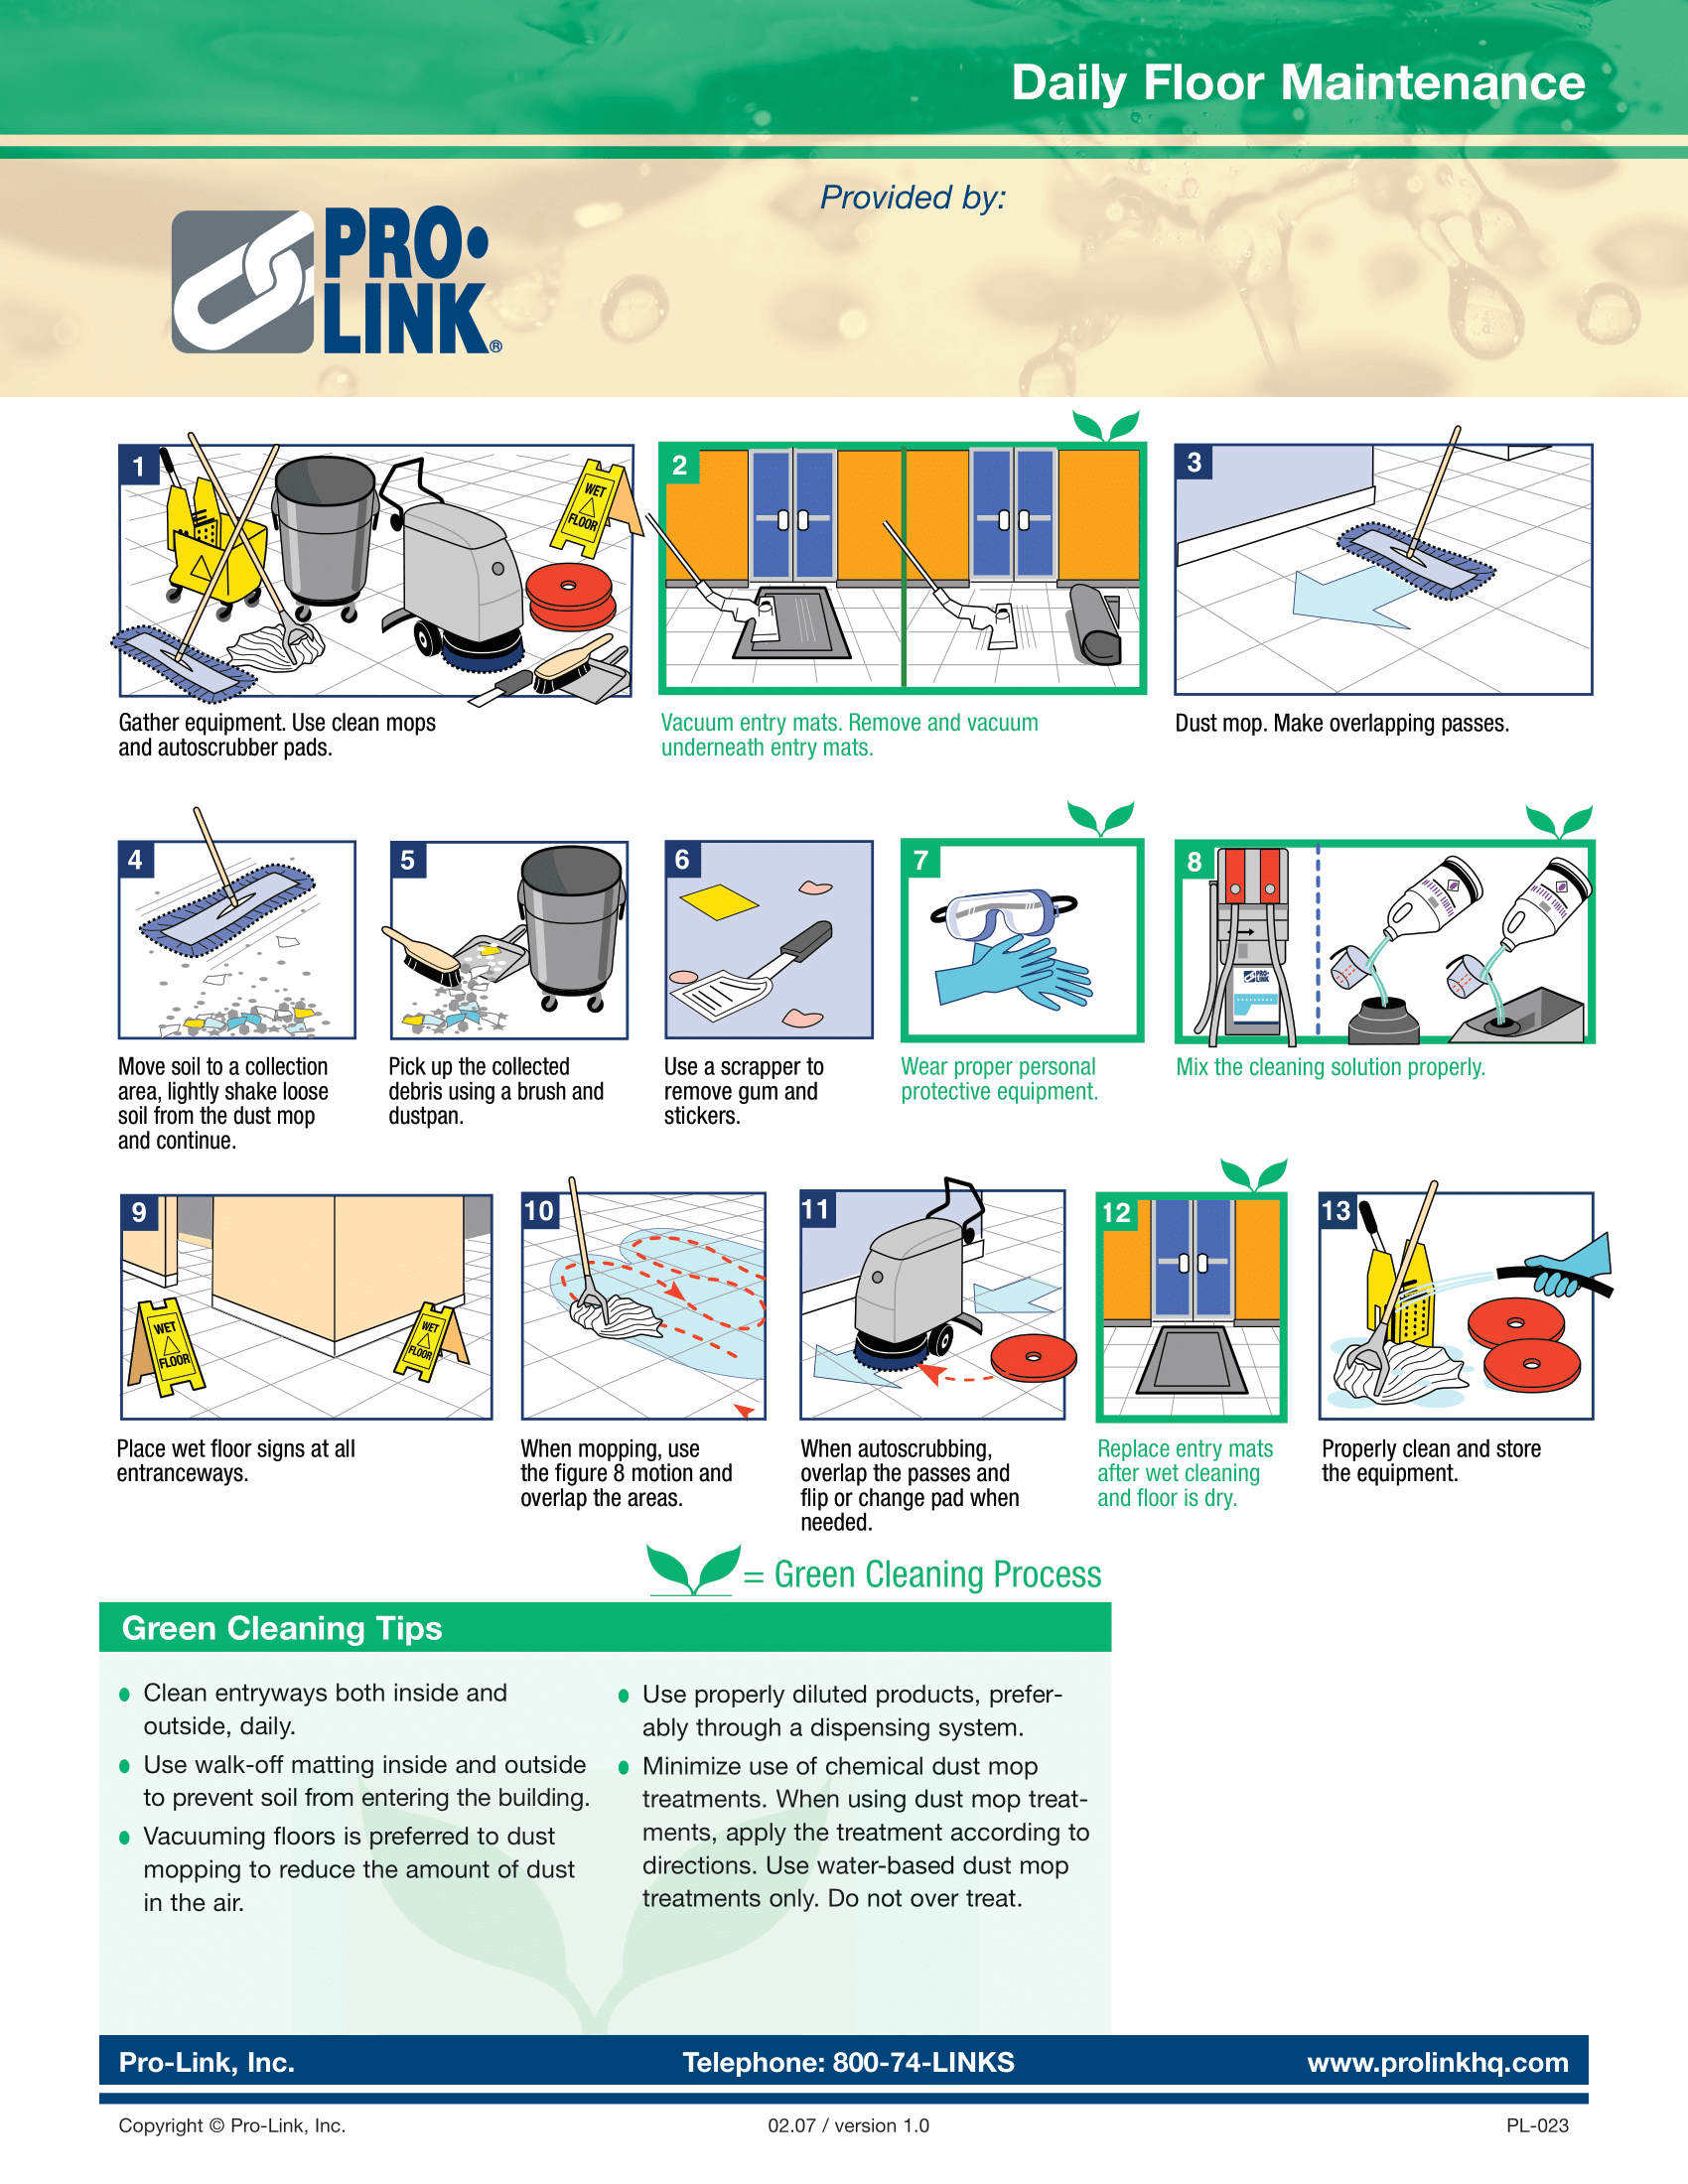
Dusting Mopping
ButtonPreparation: Take properly treated dust mop to the area to be cleaned.
Dust Mop Area: Use a dust mop of the appropriate size for the floor space that needs to be dusted. Start at one end of area. Hold the mop handle at approximately a 45 degree angle. Push the dust mop straight ahead. Shake the mop to unload it frequently. Avoid lifting the mop from the floor or moving it backwards during the dust mopping procedure. Remove gum with putty knife. Turn at the end of the pass and dust mop in the opposite direction. Overlap about ten inches. When dust mopping obstructed areas, such as offices or classrooms, use a small (18″ or 24″) dust mop. Start dust mopping at the entrance to the room. Work from the sides of the room to the centre. Move furniture as you dust mop and replace it in its correct position. Dust mop carefully around equipment. Remove any gum with a putty knife.
Pick Up Trash and Dirt: Use a dust pan and counter brush to sweep up accumulated trash. Empty this into a trash chute or trash container.
Clean Up: Take the dust mop to the janitor’s closet. Close the closet door and brush out dust mop with a stiff bristle brush or place the dust mop head in a plastic liner and shake it sharply several times. Cure the dust mop with dust mop treatment at the end of the cleaning operation. This allows time for the dust mop treatment to spread throughout the dust mop. It also eliminates a wet, oily streak on the floors, from the dust mop. Replace the mop head when it is soiled and return the soiled mop head to the laundry. Always hang dust mops with yarn facing away from the walls.
About Us
For over 60 years, Reliable Maintenance Products has established itself as being a progressive and professional janitorial supply and service company, serving the Northern Ontario region.
The Bertuzzi family founded the company in 1952 in Sudbury, Ontario, Canada, with additional branches located in Timmins and Sault Ste. Marie, ON.
Reliable Maintenance Products distributes a full line of janitorial supplies and equipment. Its product line includes absorbants, brooms, carpet cleaners, deodorizers, floor maintenance chemicals, food service supplies, garbage bags, hand and body soaps, industrial chemicals, mops, paper products, etc.
In 1975, Reliable Maintenance Products became the only manufacturer of cleaning supplies in Northern Ontario. We went on to develop a quality manufacturing facility that is registered with Health Canada, to manufacture disinfectants. We currently produce approximately 50 different products to serve the cleaning industry.
The Sudbury branch also boasts a large service center with well trained professionals to service all equipment repair requirements. We also service the retail market through our showrooms in Sudbury, Timmins and Sault Ste. Marie, Ontario. Our customer base includes all types; from heavy industrial to light commercial.
Reliable Maintenance Products is a member of ProLink, an international group of full service, individually owned companies like ourselves. We are linked together to not only market the successful ProLink brand of products, but to offer the multi-location company a customized acquisition program for their custodial needs.
Reliable Maintenance Products has always felt that quality, education and technology are key elements towards the success of their business. As such, Reliable Maintenance Products became the first janitorial supply company in Canada to be recognized under the ISO9001:2008 standard. We also continually improve our technology to ensure we manage an efficient operation. We will continually invest in the education of our people through programs and courses both inside and outside of our company to ensure that our customers are always receiving up to date equipment and products, while maintaining the preservation of the environment.
Reliable Maintenance Products believes its past success has been based on giving our clients an above average level of service with a professional and dedicated staff, and we hope to continue this philosophy into the future.
Damp Mopping
ButtonPrepare Area: Set up the “Wet Floor signs”. Move all obstacles and furniture.
Dust Mop Floor: Follow the dust mopping procedure.
Apply Mopping Solution: Place the mop in the detergent solution; wring it out until the mop is only damp. Mop the area lenghwise along the baseboards (be careful not to allow the mop to come in contact with the wall side of the baseboard.) Then use a figure 8 stroke on the balance of the area. Turn the mop over. Use both sides. Rinse the mop frequently. Use the heel of the mp with a hand pad to remove stubborn spots. Wipe off the baseboards, immediately, if any water has been splashed on them.
Change Solution and Mop Frequently: Use the proper dilution of the correct detergent. Always measure detergent solution. The solution should be changed whenever it becomes dirty.
When Floor Has Dried: Remove signs. Return furniture and other items cleared from the area to their proper positions.
Clean Up: Immediately clean up equipment at the conclusion of the procedure. All buckets and wringers must be thoroughly washed, rinsed and allowed to dry. All mps must be thoroughly washed and hung to dry, away from walls. All other equipment is either washed or wiped down and stored in the proper location.
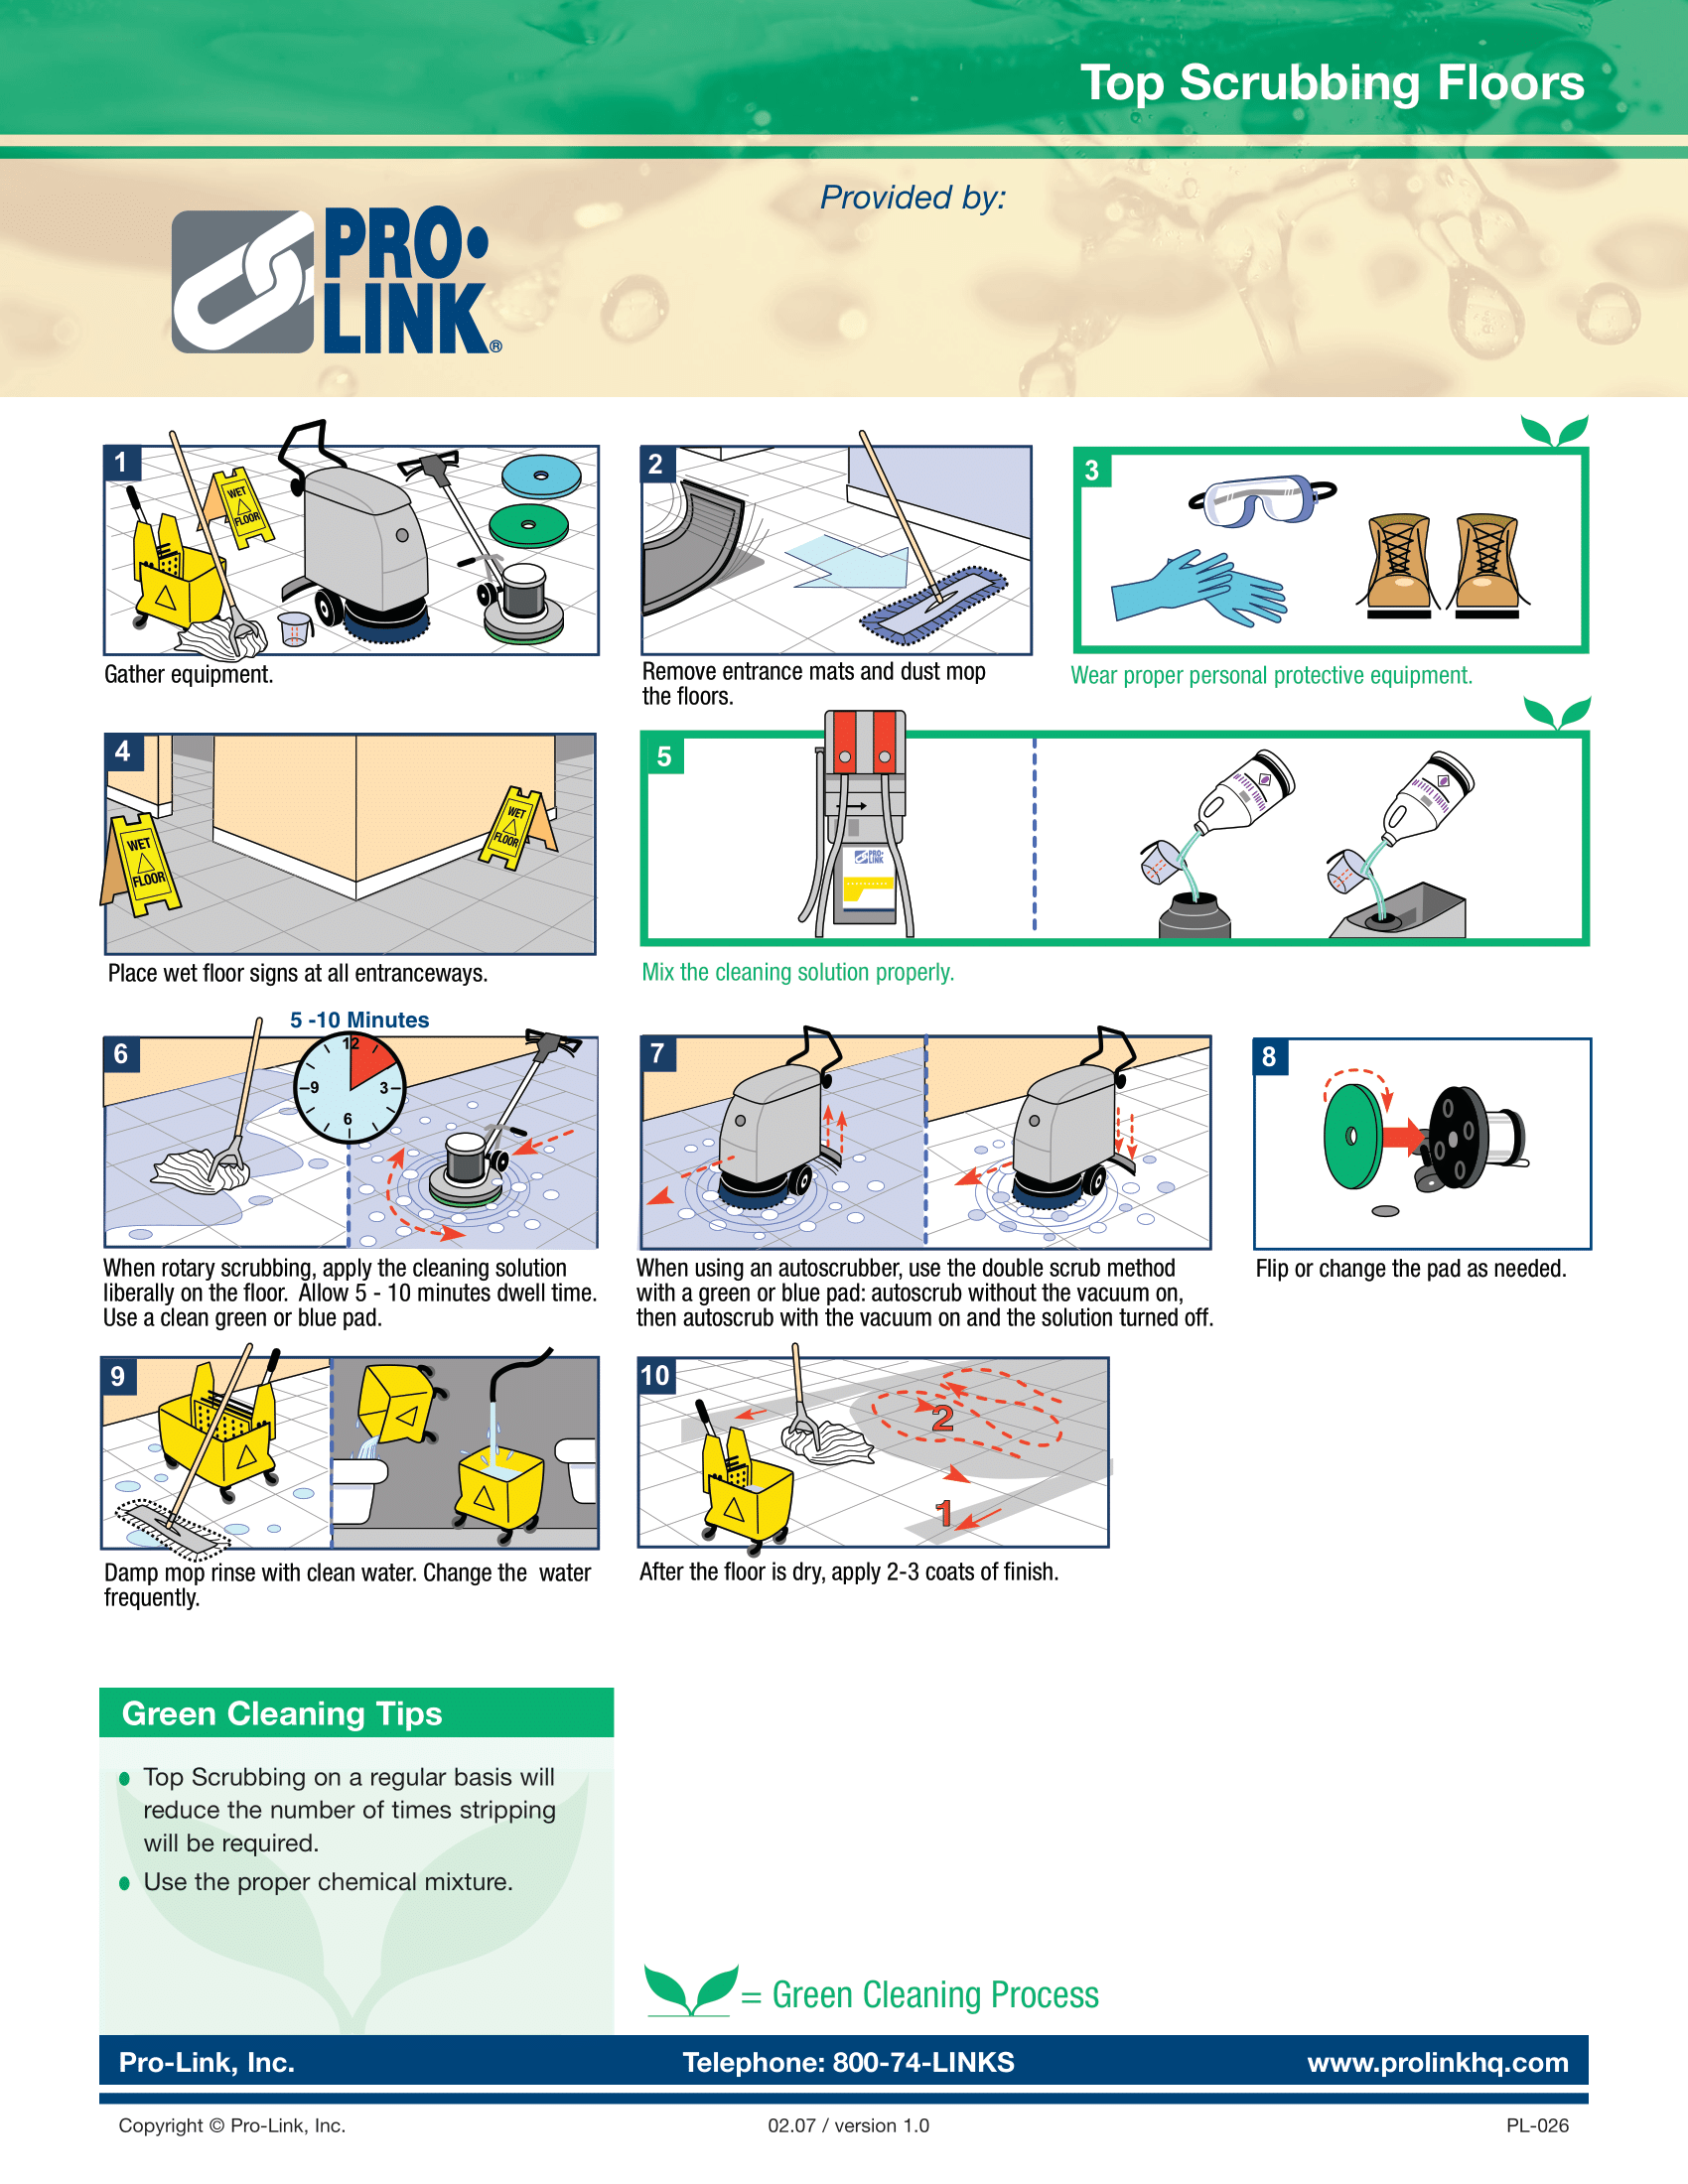
Floor Scrubbing
ButtonPrepare Equipment: Fill a bucket with correct detergent solution and water. Fill a second bucket on the mp outfit two-thirds with clean, warm water. Transport the equipment to work site.
Prepare Area: Set up “Wet Floor” signs. Move obstacles such as furniture.
Dust Mop Floor: Follow the dust mopping procedure.
Scrub Floor: Operate the floor machine from side to side while applying solution. Overlap on each pass to be sure that the entire floor has been covered. Use care to avoid bumping the baseboards and other fixed objects. Use a scrub pad and holder to scrub corners and other areas to be cleaned. Wipe off baseboards before they are allowed to dry.
Pick Up Dirty Solution: Use a wet pick-up vacuum or remove the dirty solution with the first mop. Dip the clean second mop into the clear water and rinse. Wring out the wet mop frequently. Cover the entire area to be cleaned. wipe off baseboards before they are allowed to dry.
When Floor Has Dried: Remove the “Wet Floor” signs. Return furniture and other items cleared from the area, to their proper positions.
Clean Up: Immediately clean up equipment at the conclusion of the procedure. All buckets and wringers must be thoroughly washed, rinsed and allowed to dry. All mops must be thoroughly washed and hung to dry, away from the walls. All other equipment is either washed or wiped down and stored in the proper location.
Automatic Floor Scrubbing
ButtonPrepare Equipment: Fill the automatic scrubber machine solution tank with correct detergent solution. Fill the mop bucket half full with clan water. Transport the equipment to the work site.
Prepare Area: Set up the “Wet Floor” signs. Move obstacles such as furniture.
Dust Mop Floor: Follow the dust mopping procedure.
Scrub Floor: Use light brush pressure and scrub with the squeegee down. Make a single pass over the area to be cleaned. Shut off the solution a few feet prior to making any turns. Remove any inaccessible puddles with a wet mop or squeegee the water over to a point that can be reached by the automatic machine.
When Floor Has Dried: Remove signs. Return furniture and other items cleared from the area to their proper position.
Clean Up: Immediately clean up equipment at the conclusion of the procedure. All buckets and wringers must be washed, rinsed and allowed to dry. All mops must be thoroughly washed and hung to dry away from the walls. All other equipment is either washed or wiped down and stored in the proper location.
Floor Stripping
ButtonPrepare Equipment: Fill the mop buckets half full with hot water. Measure and add the floor stripping concentrate to one of the two buckets. Transport the equipment to the work site.
Prepare Area: Set up “Wet Floor” signs. Select an area of about 200 square feet. Place mats at exit points so that wet shoes can be wiped off instead of tracking stripper solution into other areas.
Dust Mop Floor: Follow the dust mopping procedure.
Apply Stripping Solution: Generously spread the floor stripping solution over area with one of the mops. Allow the solution to work on the floor for the recommended time (usually at least 5 minutes.) Do not allow the stripper to dry.
Machine Scrub: Place the floor stripping pad under the floor machine or use the stripping brush. Scrub lengthwise along baseboards. Then strip side to side over the remaining area. Use the hand scrub pad to detail strip along the edges and in the corners of the room. Heel the floor machine on badly soiled spots. Avoid splashing stripper on walls.
Rinse: After each section has been stripped, pick up with a wet vac. Rinse the floor well with water and a stripper neutralizer. This step should be repeated a second time. Damp mop the floor with clean water and let it dry for at least one hour.
Clean Up: Immediately clean up equipment at the conclusion of the procedure.
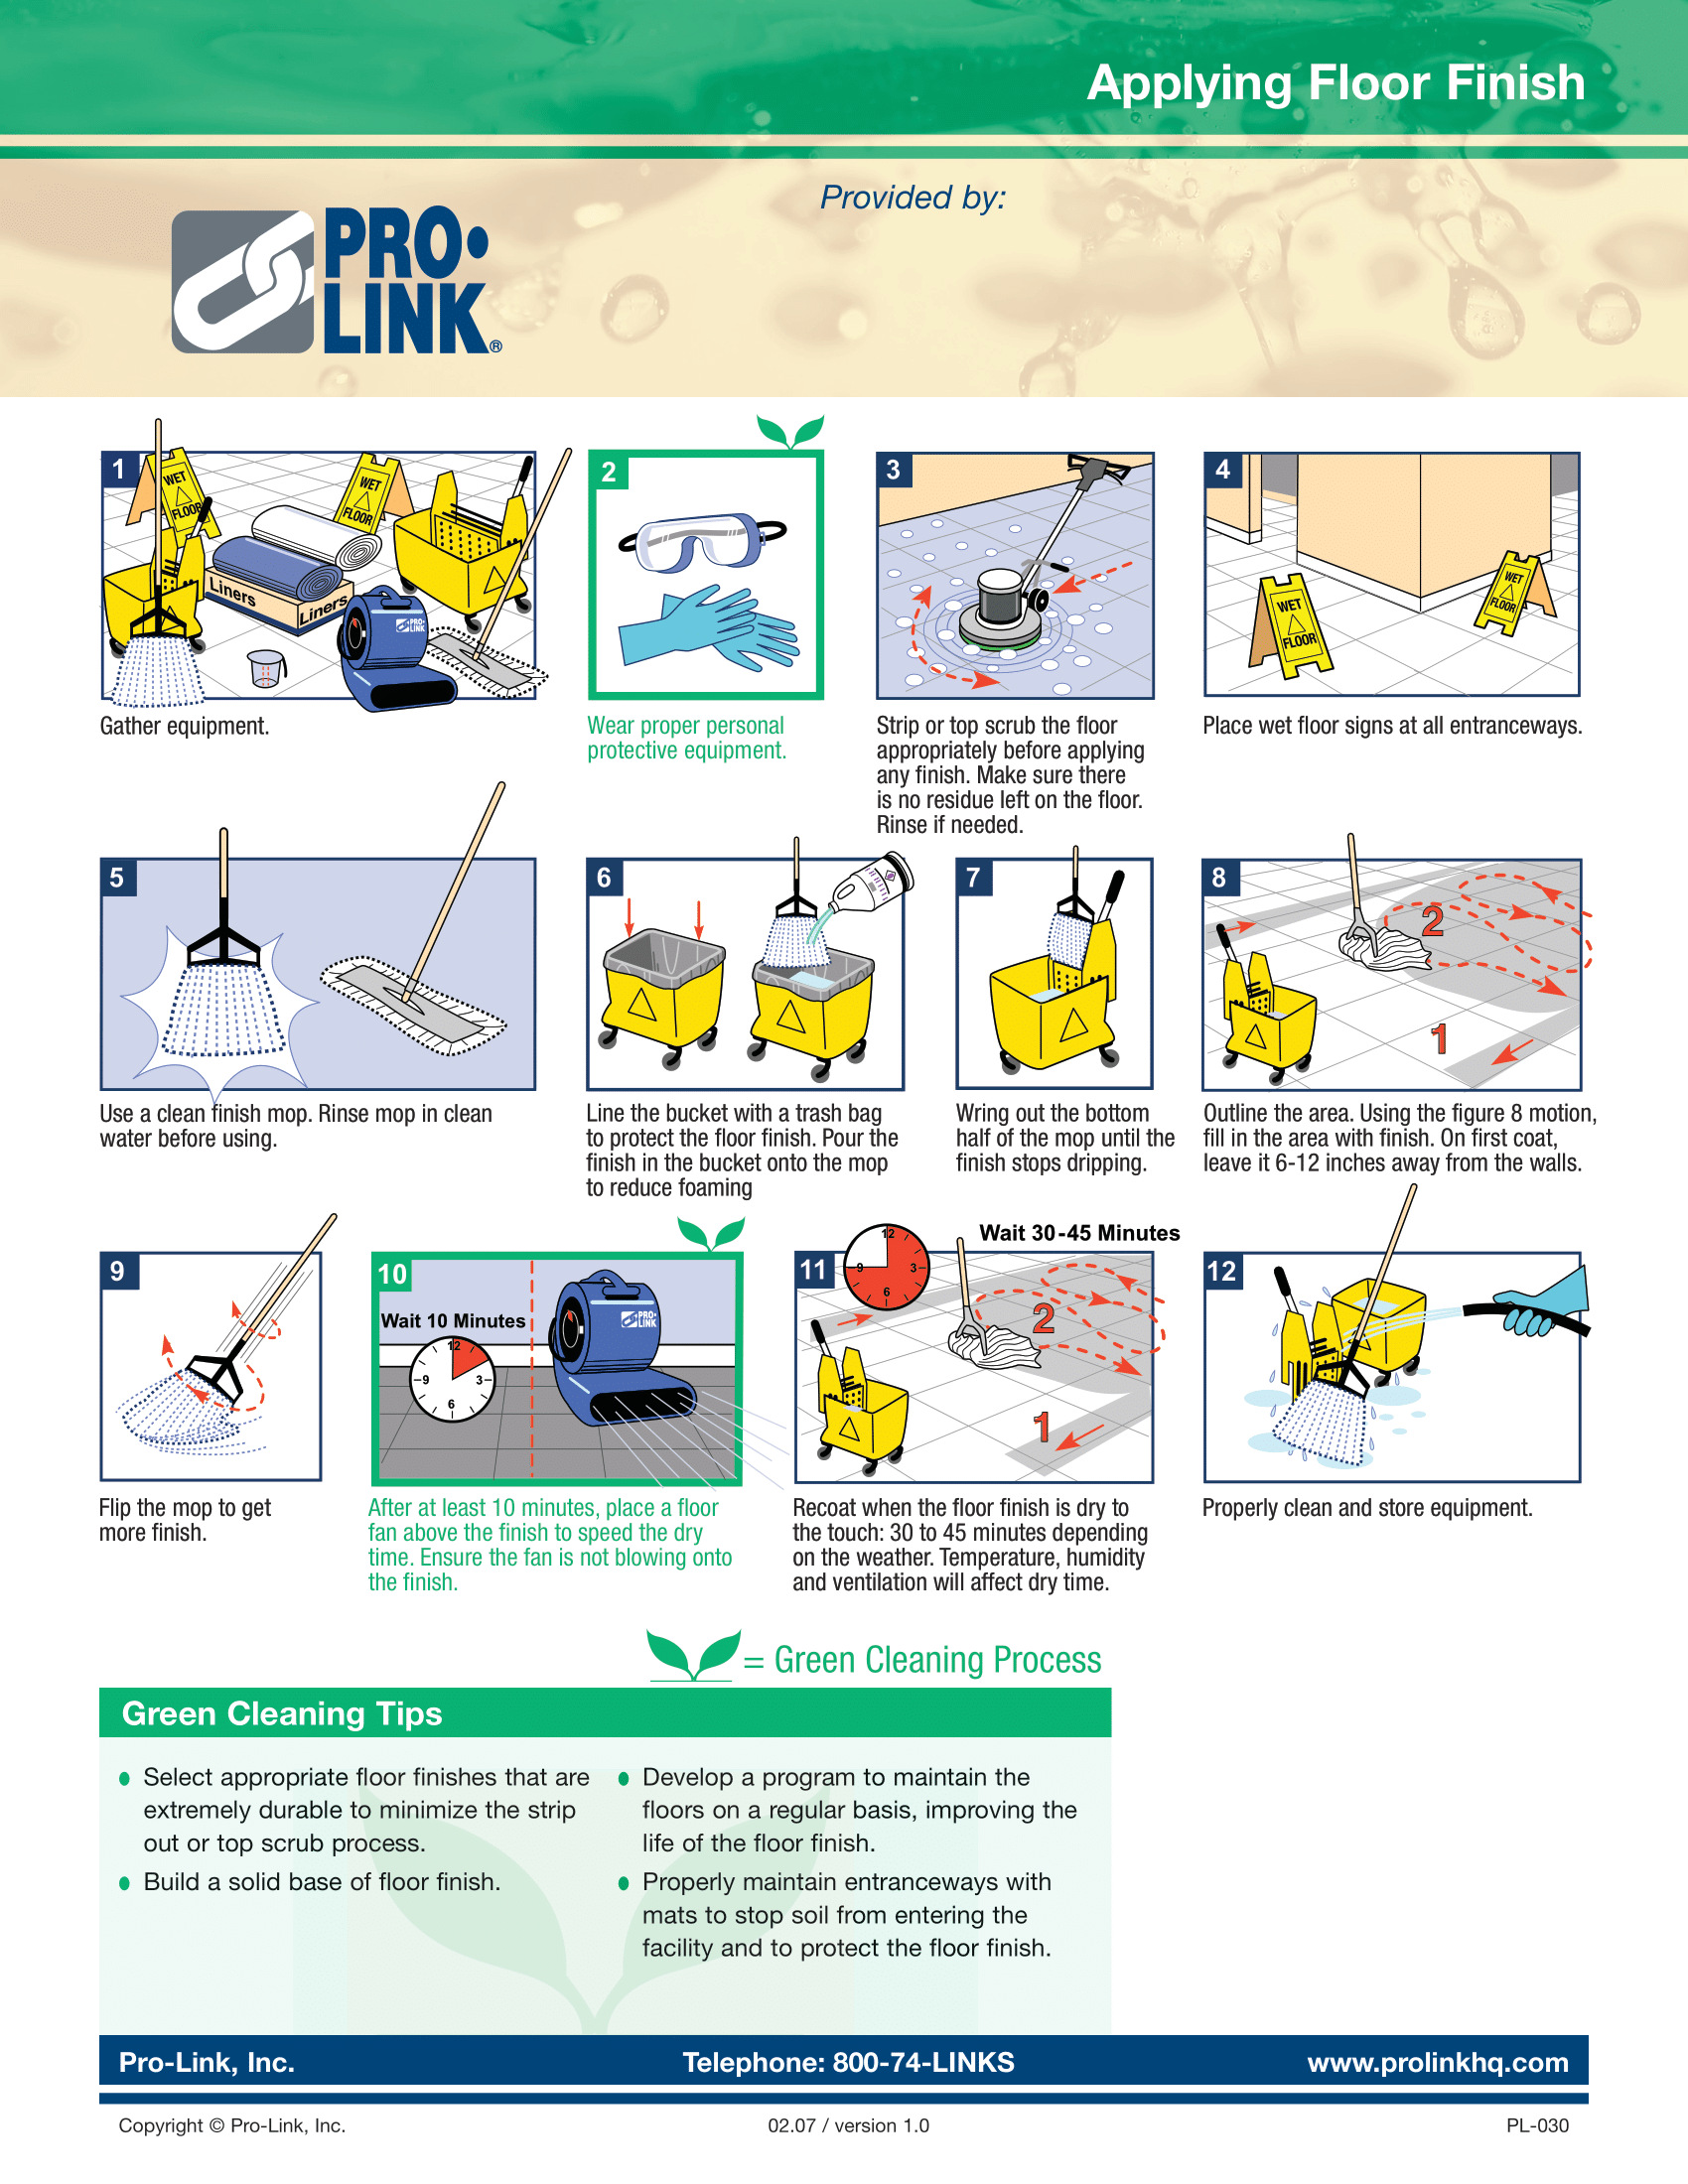
Applying Floor Finish
ButtonPrepare Equipment: To save clean-up time, line the mop bucket with a new plastic trash liner bag.
Inspect Floor: Make sure that the floor is thoroughly dry and clean.
Prepare Area: Set up the “Caution” signs in public areas. Avoid blocking doors whenever possible. Place doorway mats at entrances.
Apply First Coat of Seal: Start by pouring the floor seal into the lined bucket and place a clean non-rusty wringer into the bucket. Take the clean mop and immerse the mop in the finish. Wring the mop out slightly; to eliminate dripping. Apply a THIN coat of finish to the floor. Start applying the floor finish by running the mop parallel to and next to the baseboard. Do not apply finish to the vertical portions of baseboard and walls. Form a ‘U’ shape section of applied finish. Cover the remaining floor area, inside the ‘U’ using ‘figure 8’ strokes. Use additional finish as needed. Be sure to cover the entire floor. Avoid splashing the floor finish. Allow the first coat of finish to dry completely.
Apply Second Coat of Seal: Repeat the above instructions. You may wish to avoid building up edges by keeping a few inches away from the baseboards. Apply a THIN coat of seal. This second application should be made using the ‘figure 8’ pattern which reduces back fatigue. Allow second coat to dry.
Additional Coats: Repeat the above instructions using ‘floor finish’ for the next two and subsequent coats. More coats allow more protectin for the floor and a better appearance. If a high speed burnishing program is used, apply at least two coats of finish over the seal. Let the floor dry as long as possible before opening to traffic.
Clean Up: Immediately clean up equipment at the conclusion of the procedure. All buckets and wringers must be thoroughly washed and hung to dry, away from walls. All other equipment is either washed or wiped down and stored in the proper location.
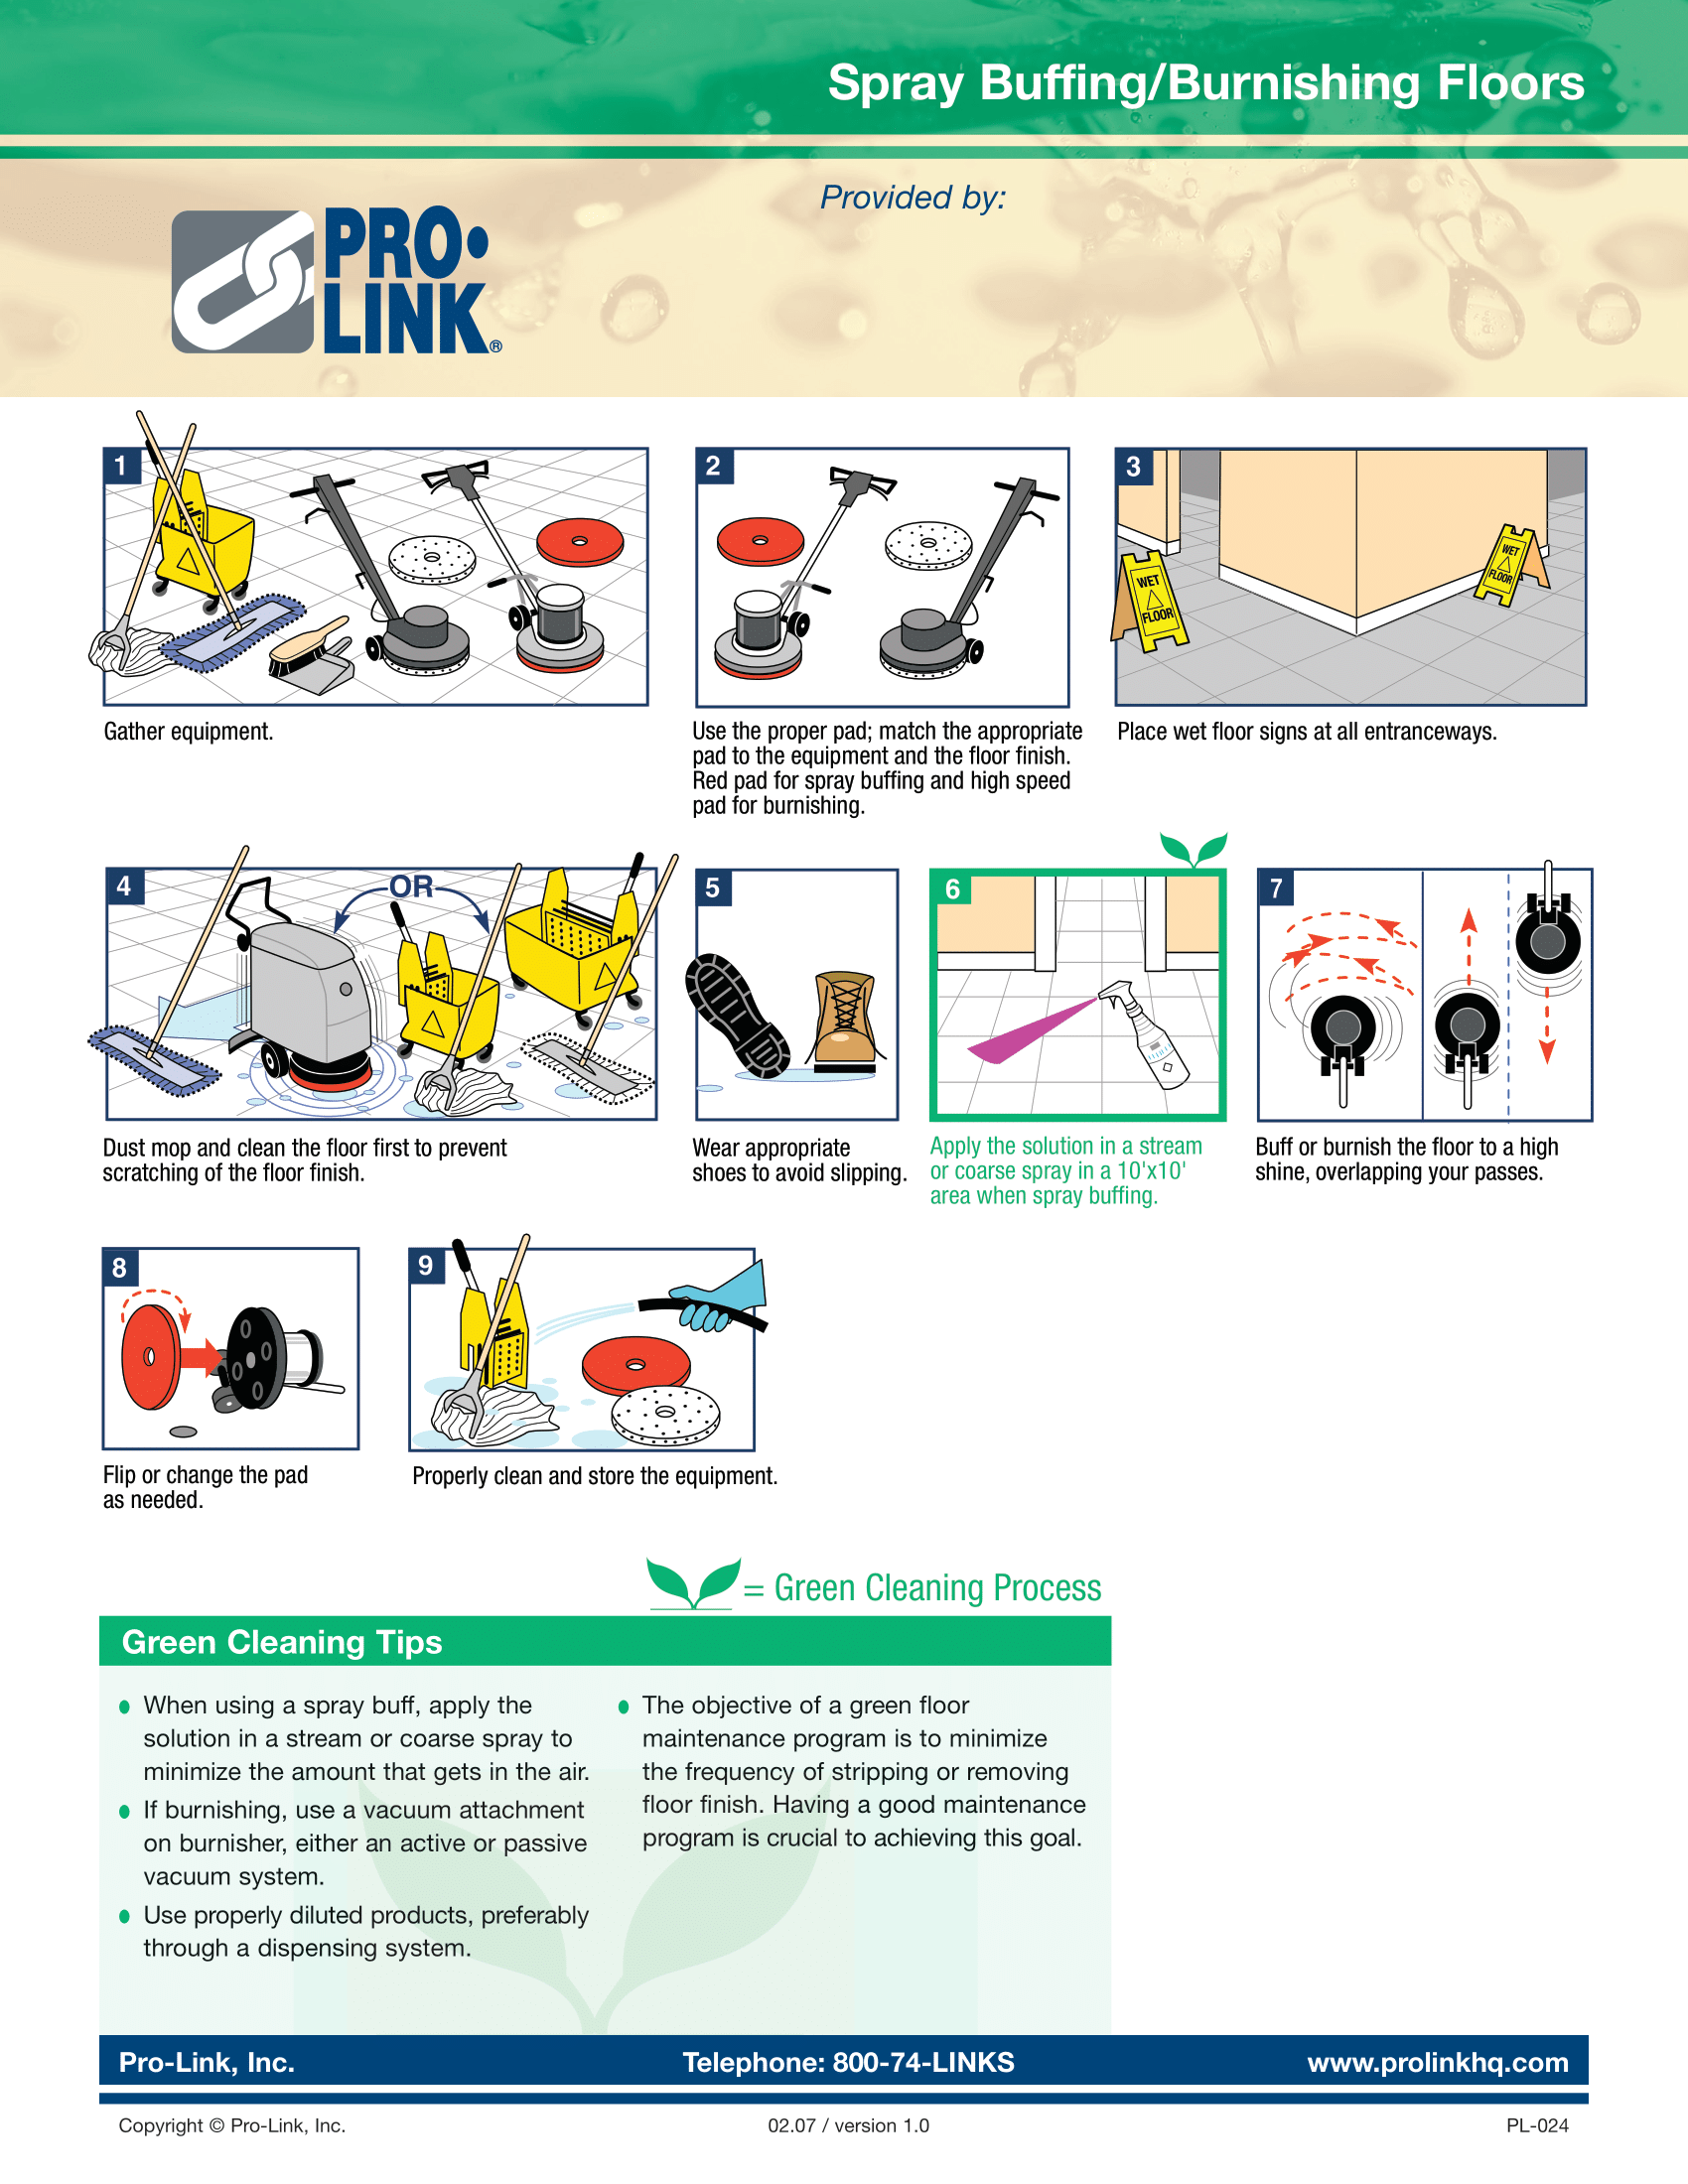
Spray Buffing Floors
ButtonPrepare Area: Set up “Wet Floor” signs. Move all obstacles, such as furniture out of the way.
Dust Mop Floor: Follow the dust mopping procedures.
Damp Mop or Autoscrub: Follow the damp mop or auto-scrubbing procedures.
Machine Buff Floor: a) Spray Method – requires a 175-1500 RPM machine. Spray conditioning restorer in a high mist over a sectin of the floor. Immediately buff the sprayed section until the floor is dry. Always overlap two to three inches to provide uniform coverage. Repeat until complete. Polish the floor with a whie pad if so desired. Finally dust mop immediately.
Vacuuming
ButtonPrepare Area: Take carpet vacuum equipment to the work site. Place a ‘Caution’ sign in a prominent location.
Set Up Equipment: Plug in machine and place in a central location. Be sure equipment has a three prong plug. To move tank type equipment short distances, pull by the hose. To move longer distances, rewind the cord and push vacuum itself. Take care not to bump the walls or furniture.
Vacuum Carpet: Generally use a push-pull stroke about 3′ long. Vacuum so that the nap of the carpet is laid by the pull stroke. Overlap strokes slightly until area is covered. Use the accessory tools for hard-to-get-spots. Move furniture and equipment as little as possible. Do not over clean. Usually two strokes per pass are sufficient. Watch cord carefully as it can present a safety hazard. Work away from the wall with the cord plug outlet to help avoid being tangled in the cord.
When Finished: Remove the ‘Caution’ sign. Return the vacuum equipment to storage area. Check to make sure that the filter bags are not full. If they are full, empty the bag or replace it with a new disposable bag. Also check for worn brushes or brush strips and replace immediately.
Clean Up: Wipe the vacuum unit and cord clean of any loose dust or soil.
Carpet Maintenance
ButtonSpot & Stain Removal: Prompt action is the key to successful spot and stain removal. A fresh spot will be easier to remove before it has dried out and been ground into the carpet by traffic. Stains not treated promptly are more likely to cause permanent damage. PL- All Purpose Spotter, is the all-purpose spotter for use on most stains from food and beverage spills. For special problem stains, PL- Master Spotting Kit, contains all the products needed by the carpet care professional.
Shampoo & Extraction: a)Interim Cleaning: Traffic lanes in entryways, corridors and around high traffic areas require more frequent cleaning to maintain a high level of appearance. Spin pad cleaning using cotton or fibrous pads, a standard rotary floor machine and specially formulated PL – Spin Shield.
Carpet Treatments: After cleaning, carpets should be treated to provide protection against stains and soiling with Concentrated Carpet Protector. Stop Stat by Avmore, helps make the carpet resist dust and helps protect sensitive electronic equipment from static electricity.
Bonnett Cleaning (Interim)
ButtonPreparation: Remove all obstructions from the area to be cleaned. If possible, remove the furniture out of the way. Vacuum the area prior to cleaning. Assemble all the equipment and supplies and take them to the area to be cleaned. Fill solution pressure sprayer and bucket and add the properly measured carpet bonnet solution to the water.
Carpet Bonnet Cleaning Procedure: Move the floor machine area to be cleaned. Attach the pad holder to the machine. Spray carpet bonnet with carpet bonnet solution. Spray 4′ x 8′ area to be cleaned with carpet bonnet solution. Place the carpet bonnet under the pad holder on the floor machine. Spray the exposed surface of the bonnet with the cleaning solution. Bonnet buff the area that has bee sprayed. Move the machine at a gradual, steady pace. Spray another area. Turn the carpet bonnet pad over and repeat this procedure. Keep the carpet bonnet pads clean by rinsing and wringing them out in clear water in the mop bucket and wringer. When the area is clean, allow the carpet to dry before replacing furniture. Wet carpets can cause rust and indentations from furniture. Air Mover machines speed drying times considerably. Also foil or cardboard squares may be used under the legs of furniture if the room must be put back into service before the carpet is dry.
Clean Up: Empty all unclean solution. Thoroughly wash out and rinse sprayer. Wash bucket and wringer until there is not soil residue remaining inside. Wipe with a clean, lint free wiper. Wash all bonnets and hang to dry. Wipe floor machine and cord clean.
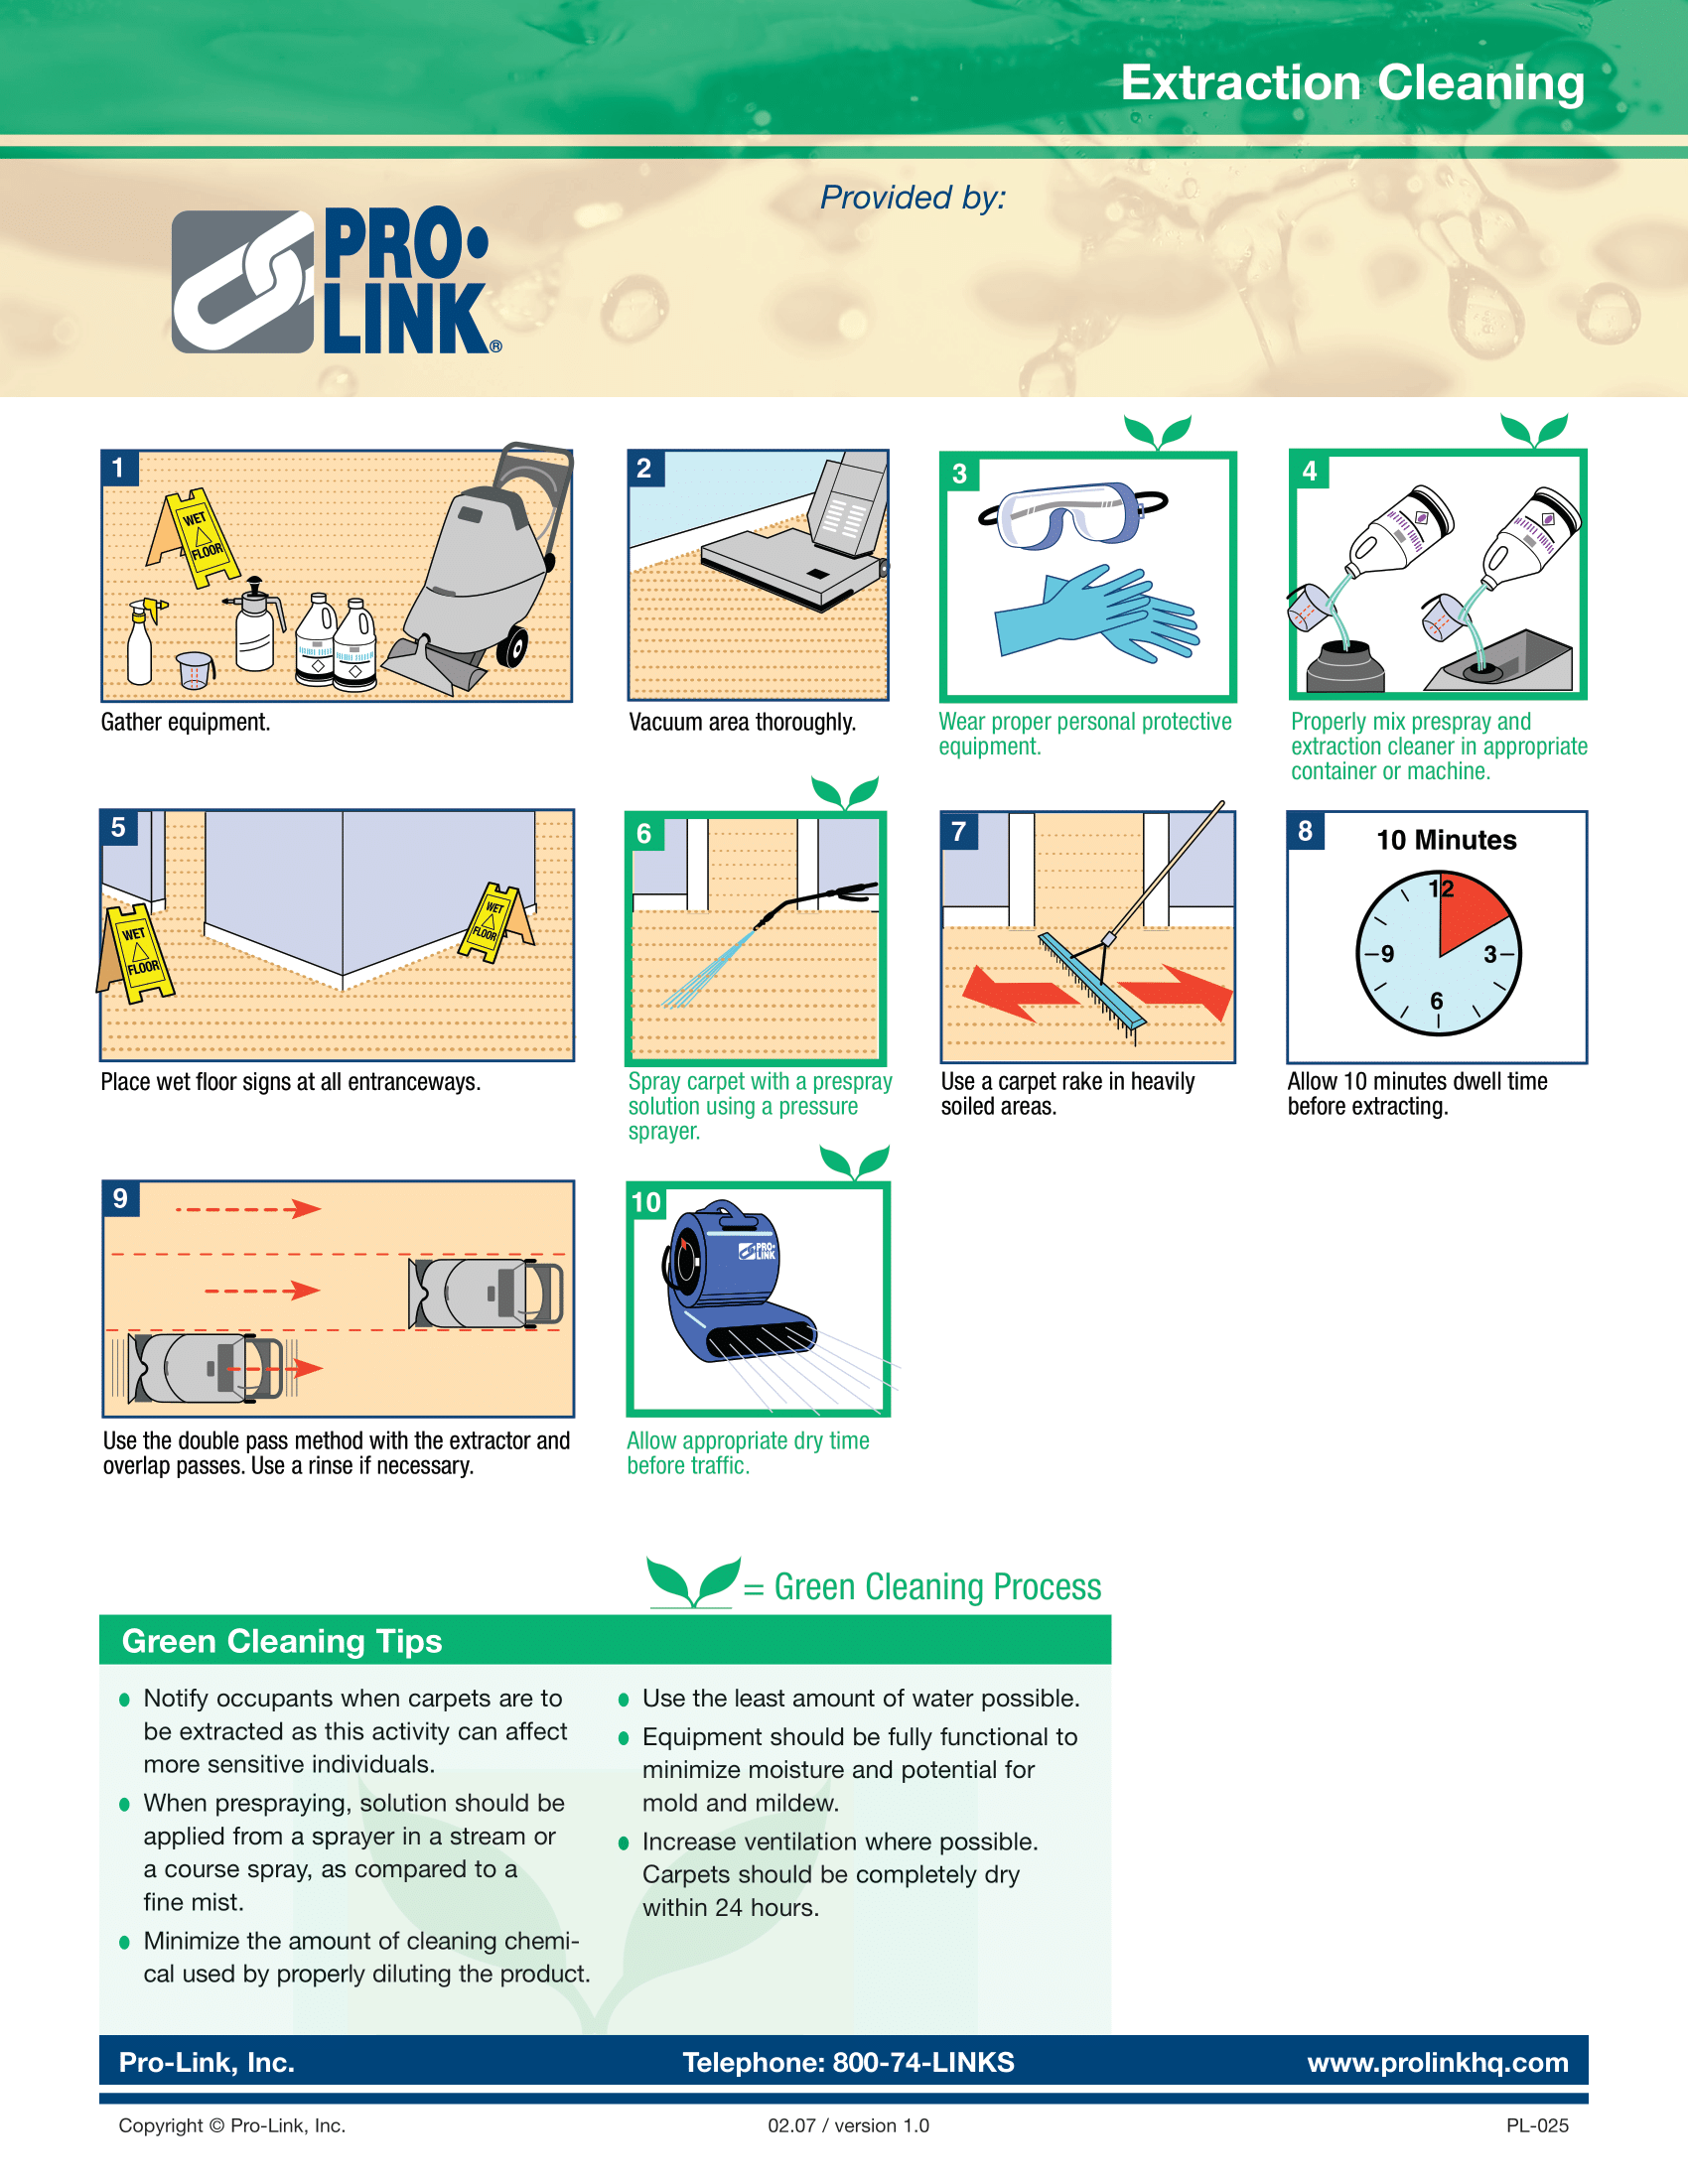
Carpet Extraction (Restorative)
Preparation: Remove all obstructions from the area to be cleaned. If possible, remove the furniture. Vacuum the area prior to cleaning with an extractor. Assemble all the equipment and supplies and take them to the area to be cleaned. Fill solution tanks or portable buckets and add the properly measured extraction solution to the water.
Carpet Extraction Procedure:
Move carpet extractor machne to area to be cleaned.
Place the vacuum tool on the carpet.
Turn the pump/sprayer and vacuum switches to the on position.
Move the machine at a gradual, steady pace. Be sure that the pickup tool is moving while the pump and sprayer are on.
When you have made a complete pass over the area to be cleaned, turn off the pump/sprayer. Continue to pick up with the vacuum shoe until you have extracted the area between the sprayer nozzles and the vacuum shoe (this space varies from machine to machine.)
Repeat this procedure on the next section of the carpet. Be sure to overlap 2 or 3 inches on each pass.
When the area is clean, allow the carpet to dry before replacing the furniture. Wet carpet can cause rust and indentations from furniture. Air Mover Machines speed drying times considerably. Also, foil or cardboard squares may be used under the legs of furniture if the room must be put back into service before the carpet is dry.
Clean Up: Empty all unclean solution from the extractor tanks. Thoroughly flush out and rinse both tanks. Wash recovery tanks until there is no soil residue remaining inside. Wipe with a clean, lint free wiper. Repeat this procedure in the clean solution tank. run clean solution through all vacuum hoses before transporting them to other areas. Thoroughly wash and wipe all domes and lids. Clean the outside of the machine before transporting to other areas. Wash and wipe the vacuum shoe and spray nozzle area. Remove the dirt, fuzz and lint before the machine is moved to other areas.
Basics Of Wood Floor Care
ButtonNew Procedure: Scrub the floor with a neutral cleaner, vacuum up the solution with a wet vacuum. Damp mop the floor several times, allowing to dry overnight. Apply either buffable or non-buffable wax to floor, allowing proper drying time between coats (usually 24 hours).
Basics Of Concrete Floor Maintenance
ButtonMaintenance: Stripping – For total renovation of old floors, strip with concrete seal remover following label instructions. Work stripped floor with floor machine and stripping pad to remove finish. Sweep floor with push broom to pick up all particles and dust.
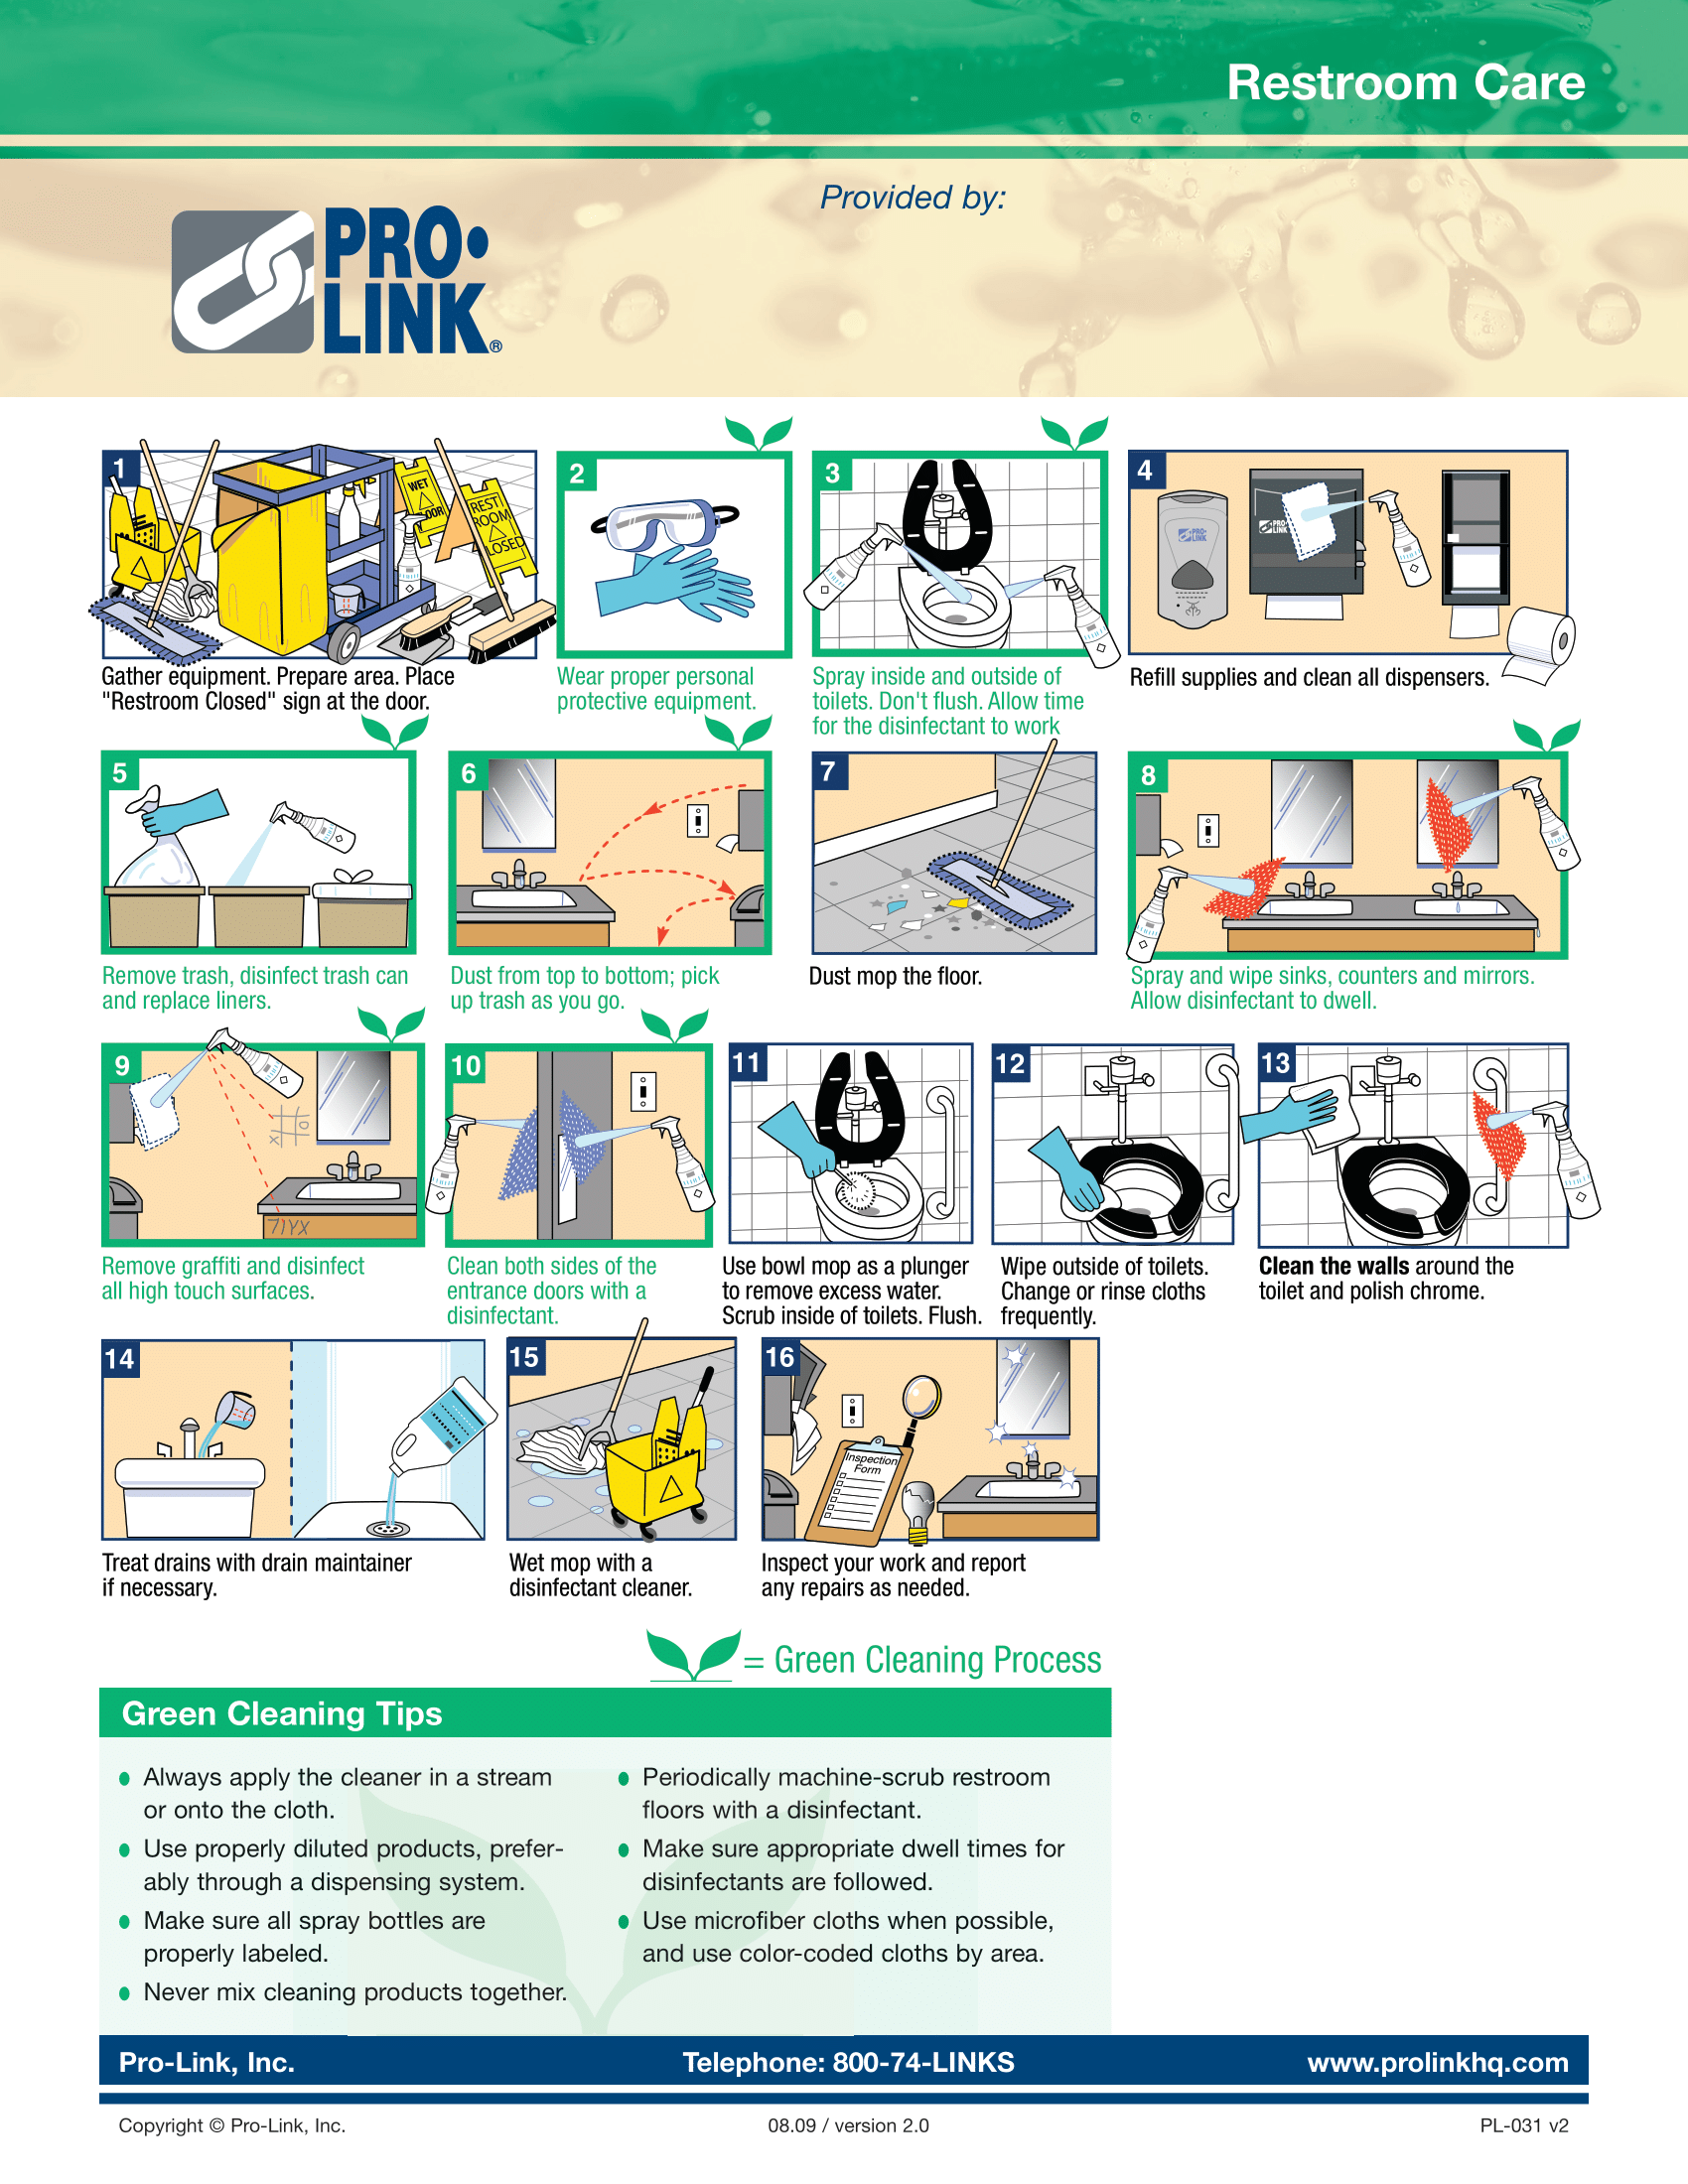
Restroom Cleaning
ButtonPrepare Area: Scrub the floor with a neutral cleaner, vacuum up the solution with a wet vacuum. Damp mop the floor several times, allowing to dry overnight. Apply either buffable or non-buffable wax to floor, allowing proper drying time between coats (usually 24 hours).
Toitlet Bowls & Urinals: Apply toilet bowl cleaner to toilets and urinals. Follow the instructions printed on container. Let the cleaner stand while the balacne of the restroom is being cleaned.
High Dust: Remove all dust webs with a lambswool duster. clean the wall vents, tops of the doors and partitions with wipers dampened with disinfectant solutions.
Replenish Supplies: Refill all hand soap, hand towel, toilet tissue and sanitary napkin dispensers. Check the deodorizers and refill them when it is necessary. Check the working condition of all the dispensers in the restroom.
Clean Light Fictures & Mirrors: Wipe off the light fixtures and mirrors with glass cleaner and clean wipers. Move around the restroom until all are cleaned.
Clean Wash Basins: Using a creme cleanser, mild acid cleaner or germicidal solution (depending on soil levels) clean the interior surfaces of all wash basins. Exterior surfaces, faucets and piping under basins should also be clelaned daily. Wipe chrome dry with soft cloth or wiper. Wash basin should be disinfected during each cleaning operation. Do not use powerful acid toilet bowl and urinal cleaners in wash basins. Wash basins are made of baked enamel that will be removed by strong acids or scrubbing with harsh abrasives. Use strong acid cleaners only on vitreous china toilets and urinals. Check faucets for dripping and ease of operation; also check the drain flow to see that each drain is clear and empties the wash basin properly.
Spot Clean Walls & Partitions: Dampen a cloth with a germicidal solution or spray germicidal cleaner directly to the surface. Wipe off shelves, dispensers, receptacles, doors and partitions.
Clean Inside of Toilets and Urinals: Clean toilet bowls and urinals thoroughly with toilet bowl brush or swab and disinfectant cleaner or proper acid cleaner. Check toilets and urinals with a flashlight mirror for stains and encrustations that are under the rim. Do not damage the smooth surface of vitreous china toilets and urinals by heavy scrubbing with abrasive materials. Flush, agitate with brush or bowl swab. Flush again.
Clean Exterior of Toilets and Urinals: Moving down the line, clean from top to bottom with germicidal solution mixed at proper dilution. Disinfect all surfaces, pipes, and valves.
Pick Up Waste From Floor: Use a dust pan and broom to pick up all paper and trash from the floor. Use a putty knife to remove any gum.
Clean Waste Receptacles: Empty and remove trash can liners, then wipe the interiors with a germicidal solution. Replace liners.
Clear Floor of all Obstructions: Remove all supplies and equipment. Put waste receptacles out of the way.
Mop Floor Application: Properly measured germicidal solution and hot water around the toilets and urinals. Begin at the far end of the retroom; wet mop floor or spray with a portable pressure sprayer. Allow wet disinfectant solution to work for up to ten minutes (during the waiting period move equipment and supplies to other areas. Wring out the mop and pick up the excess solution. Scrub with a deck brush if heavy, visible soils are present.
When Floor Has Dried: Replace all of the waste receptacles. Remove the ‘Closed for Cleaning’ sign. Wash hands and arms carefully, to avoid cross contamination. Rinse and wipe down the sink.
Window Cleaning
ButtonPreparation: Assemble all necessary supplies and take them to the windows to be washed.
Window Cleaning: Mix window cleaning solution in the bucket. Apply solution to the window evenly with a window brush or strip washer, be sure to cover the area completely.
Start to squeegee the window by placing the squeegee at the top and gliding the squeegee to the corner of the window. Glide the squeegee downward to the corner of the window. Use a consistent, even pressure on the squeegee all the way down to the bottom corner of the window. Repeat this across the window.
Wipe off the squeegee with a rag or chamois and gegin at the top of the window again. Slant the squeegee downward on the dry, cleaned side of the glass. Continue all the way down the glass to the bottom of the window. Repeat this until the window is cleaned completely. When you finish the window, wipe the sills clean and dry with wipers or rags.
Clean Up: Wash out the bucket and dry it. Wash out chamois with clean water and hang up to air dry. Wash rags. Rinse squeegee and wipe them dry. Store squeegees in a cool, dry place. Do not store squeegees on their blades.
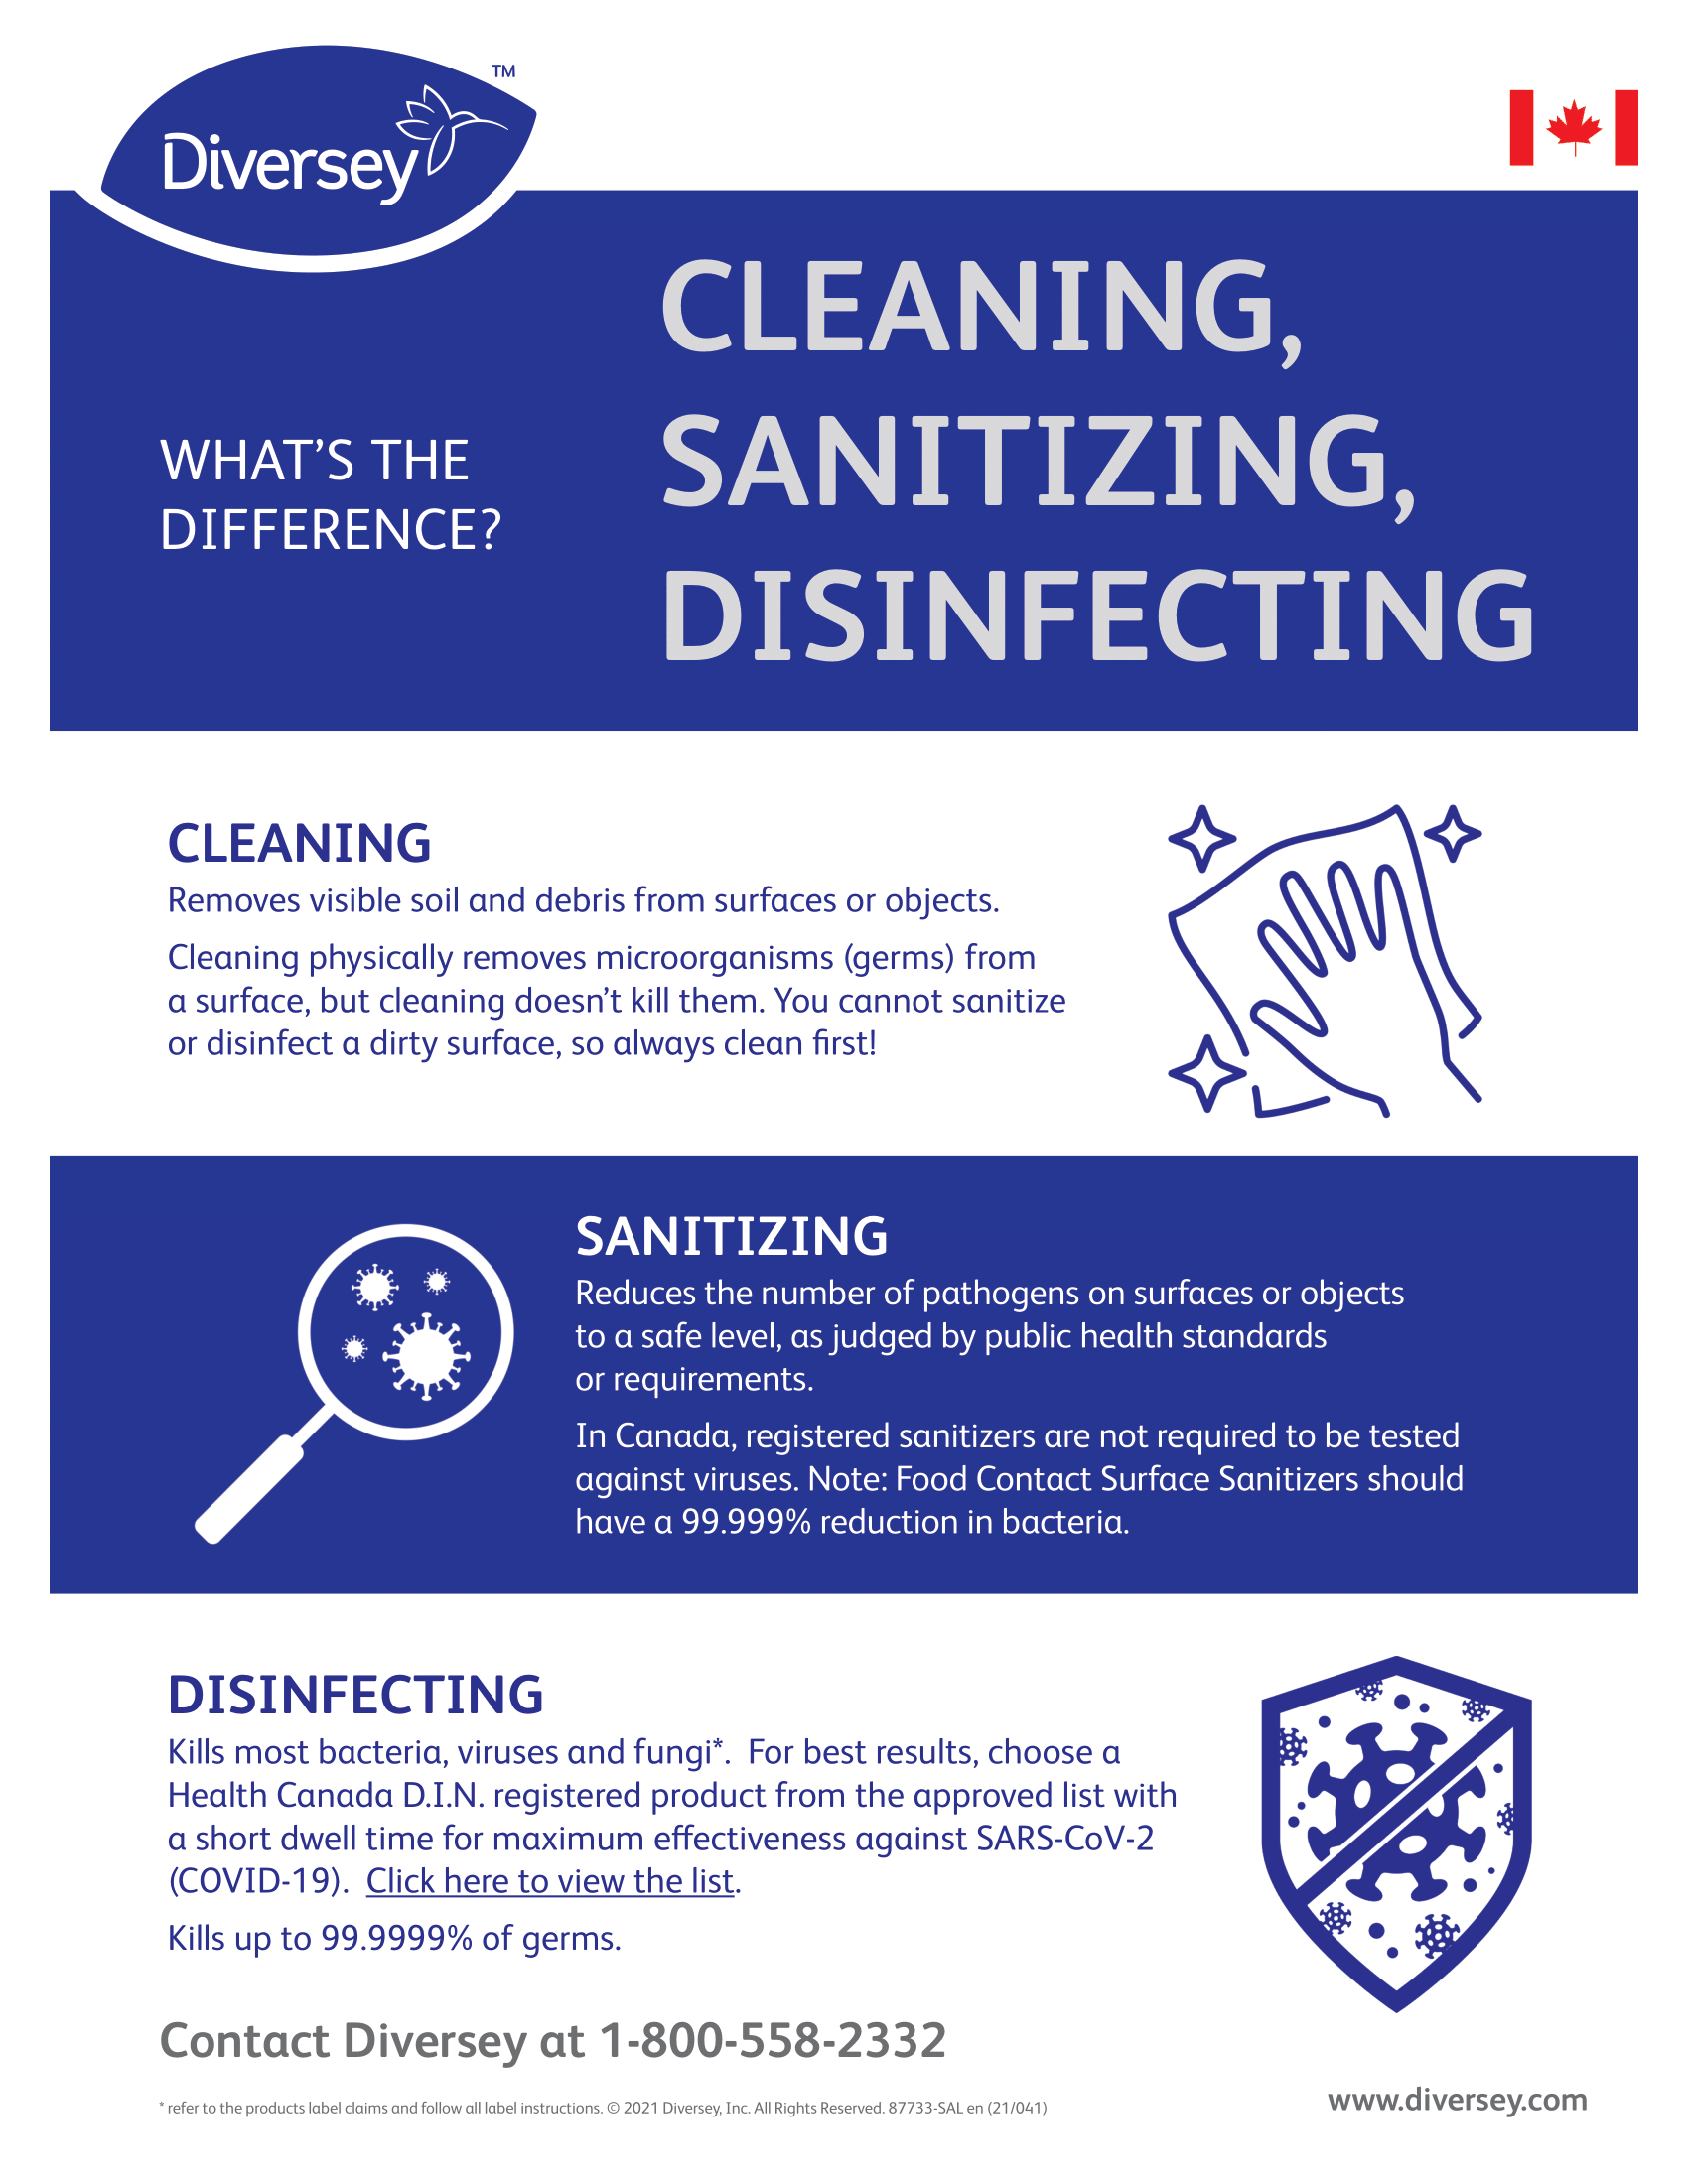
Cleaning
ButtonAlkaline Cleaners: The bulk of industrial cleaning is carried out with compounded alkaline cleaners (alkaline salts plus surfactants with many variations and compositions). A discussion of the term ‘Synergism’ and its implications is necessary at this point.
Synergism:
Synergism is the ability of two or more ingredients to cause an action which is greater than the sum total of the individual ingredients. This action may be measured in terms of time required to cause the desired result or in the ability to even show any result. These ingredients in combination cause results which could not be expected at all if the ingredients were used alone.
The number of combinations that are possible in alkaline cleaning to effect a good reaction are infinite. However, the selection of these ingredients is what makes some products winners and others loser. It is because of this phenomnena of synergism that some products are more expensive than others, because many of the ingredients that are good synergists are very expensive. It therefore, becomes very important to look at the ‘cost-use’ of a product rather than its price per gallon. If a product is marketed for 3 dollars a gallon and requires twice as much to affect the same cleaning action as a material which sells for 5 dollars a gallon, then obviously the 5 dollar a gallon material is cheaper to use. Selling formulated cleaning products on price alone is a very serious mistake.
Industrial alkaline cleaners are compounded to be either broad spectrum or precisely applicable. The broad spectrum types of cleaners might remove a wide variety of soils in a resonably efficient manner but might be better or worse for specific soil. The precisely applicable compounded cleaners would be most efficient for a specific soil might be made available to one company for the same purpose such as cleaning steel. One cleaner might remove a variety of fatty oils, mineral oils, solids, etc., in less than 15 minutes with better than ninety percent efficiency. This would be the broad spectrum type. Another might clean mill oil covered steel sheet with 100% efficiency in 8 minutes but might be quite poor for other soils.
What Makes a Good Cleaner:
Still another might be excellent for fatty oils but only average for other soils. Cleaning efficiency is quite often a factor in the price of the product. As mentioned before, many of the synergistic additives are quite expensive, however, they usually more than pay for themselves in making the cleaner do the job at a much lower concentration.
If a competitor’s product is substantially cheaper than one that we have selected to do the job then it becomes necessary to talk to the customer about cost performance rather than cost of the product. For trial purposes, the customer should try our product at the same cost-usage level as the competitor’s material. In other words, if our product is 5 dollars a gallon and the competitive material is 3 dollars a gallon than we would recommend that he try it at a concentration of one-half the competitor’s. If this is done, it is amazing how many times synergism pays off.
Alkaline Materials: There are certain alkaline salts that are used as the basis of most industrial alkaline cleaners. Some cleaners may have only one of these alkaline salts, however, most will have a combination along with the wetting agents surfactants, accelerators, etc., that promote the cleaning reaction. The most commonly used alkaline salts are:
Sodium Hydroxide(caustic soda, caustic). Sometimes potassium hydroxide (caustic potash) is used but this is more expensive
Sodium Carbonate (soda ash). Sodium Carbonate is the cheapest of the alkalines and is a very common alkaline ingredient.
Sodium Metasilicate (Metso’s)
Trisodium Phosphate (T.S.P.)
Tetrasodium Pyrophosphate (T.S.P.P.)
Cleaning Tips:
Floors
Waxed floors should be cleaned with cold water and a neutral cleaner to prolong the life of the floor wax; Reliable Exit Cleaner is an excellent product to use.
Floor wax is valuable in maintaining the original appearance of the floor.
Removing floor wax is much easier with a good wax stripper; Reliable 'Force'
Floors should also be rinsed well with water or a neutral cleaner before new wax is applied. One coat of sealer and 2 coats of floor wax is a minimal amount of product to put on the floor after stripping the old wax off.
Windows
The most effective way to wash windows
Mirrors and glass surfaces is with a window squeegee. When trying to remove the pit marks from a window that is behind a screen an aerosol oven cleaner works very well; ProLink Oven Cleaner.
When trying to remove paint from a window
Wetting the window and then scraping with a window scraper will usually remove the paint from the surface.
Washroom
If you live in an area with hard water and you find that you have stains in your toilet bowl
Than an acid based bowl cleaner would be required to remove the hard water stains; 23% Heavy Duty Restroom Cleaner.
Shower areas can be kept clean by simply squeegeeing them with a shower squeegee after showering or bathing
Thus leaving no water marks or streaks.
Mold and mildew is also a problem in many bathrooms and is best removed with the use of bleach or a disinfectant; Reliable Deterrent 128. A cream cleanser is also very effective at removing soap scum from porcelain
Plastic and metal or aluminum surfaces. (Reliable Cream Cleanser)
Laundry
If you live in an area with hard water and you find that you have stains in your toilet bowl
Than an acid based bowl cleaner would be required to remove the hard water stains; 23% Heavy Duty Restroom Cleaner.
When washing greasy clothes such as uniforms
Try adding a small amount of Reliable Cleaner Degreaser.
When washing white clothes with food stains the Reliable Torpedo Descaler also works very well at removing these stains and brightening the whites.
Carpets
We recommend that all households and businesses keep a quart of ProLink All Purpose Spotter handy. When a spot occurs on your carpeting
Simply spray the spot with the solution
Put a clean white towel on the spot and blot with your hand or foot. The spot will generally transfer to the white towel.
For specific types of stains we recommend calling us for products that have been created to get out even the toughest stains.
We do recommend the use of a carpet protector to prolong the life of the carpet and or upholstery; such as ProLink Carpet Protector.
Paving Stones
We recommend the use of a degreaser such as Reliable Citrus Power Plus whenever your paving stones become too spotted. Although it may not completely remove the spot
It usually removes the most of it on the surface of the stone.
Vehicles
If you want to clean aluminum on your vehicle
We recommend the use of Reliable Cream Cleanser as a safe alternative. For a stronger cleaner for your truck
Car or 'rig' you can use the B59 Aluminum Cleaner which does an excellent job.
Boats
We highly recommend the use of our Reliable Citrus Power Plus and or Reliable Cream Cleanser to clean the bottom of your boat. They are both effective at removing the water scum from the fiberglass surface.